
How to Start Growing a Back to Eden Garden Anytime of Year!

Planting instructions for installing a no-till organic Back to Eden vegetable garden in the Spring and Summer are simple and fun!
What is Back to Eden Gardening?
Back to Eden Gardening is a no-till organic gardening technique that uses wood chips to regenerate the soil, grow healthy plants, and nutrient-dense food. Planting seeds and transplants in a wood chip mulched garden is easy and does not involve preparing the soil by tilling or digging. The benefits are endless! Back to Eden Gardening provides better gardening success and more abundant harvest with less work, less watering, less weeding, and less money. If you don't already own the Back to Eden Gardening movie, order the DVD to watch add free with bonus features sharing gardening tips!

When Can I Install a Back to Eden Garden?Typically, we recommend growers install a Back to Eden garden in the Fall season. This is inline with when leaves and branches fall to cover the soil in nature. The reason we recommend the fall is because all you have to do is lay down weed smothering paper and then 4 inches of fresh arborist wood chips on your soil and let nature do the work to decompose and improve the soil over the winter without the need for extra labor. However, if you haven't already installed a Back to Eden Garden and want to get started in the spring or summer, it's not too late! However, in order to see great results and avoid growing problems you should take these simple extra steps!

STEP 1: SMOTHER WEEDS & GRASSES
Do I Really Need to Install a Weed Smothering Paper Layer First?
If you are feeling lazy and think tilling in the weeds and grasses will save you time and labor, think again! Tilling the weeds and grasses into your topsoil will introduce the weed seeds into your soil and you will find yourself with tons more labor trying to pull them out later in the season! It also destroys soil structure and soil life that is essential to grow the most healthy plants.
If you are installing a Back to Eden Garden on a site that has already been an established veggie garden plot and does not have weeds or grasses you can skip this step. If your garden site is covered in weeds or grasses it is very important to put down a smothering paper mulch layer directly on the soil first. If you skip this step and just throw wood chips directly on top of the weeds and grasses you will soon have a garden exploding with happy weeds and monster grass.
Can the Wood Chips Smother the Weeds Without a Paper Mulch Layer?
Wood chips can effectively smother most weeds on their own without the need for paper IF they are very thick (12+ inches) and this is way too thick of fresh wood chip mulch for planting a happy vegetable garden bed! So, follow the instructions by starting with a smothering layer.
How Do I Install the Weed Smothering Paper Mulch Layer?
In order to prepare your sight, first dig out very tenacious weeds by the root like thistles. You can leave the rest of the weeds and grasses in place. They will add nutrients to the soil and invite beneficial earthworm activity to help the soil. If your weeds and grasses are too tall to easily lay paper over, mow or weed whack them down to a manageable height. There are several options that work well and vary from being free and easily available to more costly.
Weed Smothering Paper Layer Options:
- Newspaper Sheets. Apply 4 layers thick. Wet down after applying to hold in place. Use only black and white sheets (it's non-toxic and made from plant based ink). Do not glossy or color. It's free! As your neighbors or local recycling center.
- Newspaper End Rolls. Apply 3- 4 layers thick. If you're lucky, your local newspaper printing company may be generous and give you their free end rolls, blank rolls of newspaper.
- Kraft / Butcher Paper Rolls. Apply 1-2 layers thick. These thicker paper rolls can effectively smother weeds/grasses with less work.
- Weedguard Plus. Apply only 1 layer thick. These OMRI, certified Organic paper mulch rolls were developed for organic farming to eliminate weeds. The investment may be worth it to save you time and labor!
- Cardboard: Apply one layer of cardboard, overlapping carefully. It's easy to find for free so many people enjoy using it. Paul Gautschi does not recommend this cardboard because it is too rigid and allows air pockets below for weeds to survive. I do not recommend it either if you live in very dry climates like Southern California. It took over a year for a layer to break down in my drought stricken climate. However, in wet climates all organic materials will decompose rapidly.
We have personally tried, tested and experimented with all of the above various weed smothering mulches and found pros and cons with each. They all work when used as described above! My personal favorite is the Weedguard Plus rolls, if you have the budget. The investment makes installation much more convenient and it works really well. Plus it is made from organic, food safe material.

STEP 2: Apply a Layer of Compost
Add a layer of at least 4-6 inches of compost on top of the paper mulch layer next.
What is Compost Exactly and Why Do I Need It?
Compost definition: a mixture that consists largely of decayed organic matter and is used for fertilizing and conditioning land. This is a very vague term that can often be confusing for beginner gardeners. It is what we call any organic ingredients that have been combined and decomposed into a medium resembling soil. Traditionally, healthy compost has a ratio of 30:1 carbon to nitrogen ratio. If you are not giving your wood chips and paper the time to decompose and improve your soil naturally by starting in the fall, you will need to add a layer of compost on top of the paper layer in order to plant in healthy, nutrient rich soil. If your soil is clay or dead and you want to plant in it immediately, you need to plant in a medium that provides the right nutrients to promote plant growth. The compost also adds nitrogen to the soil and helps the fresh wood chip layer break down without depleting your plants of nitrogen in the process.
Where Do I Get Compost?
You can find compost for free or purchase it in bulk by the cubic yard at your community municipal yard waste center or privately operated compost yard businesses. Always make sure it's a trusted, clean source and ask what is in it. If you are gardening on a small scale like an urban backyard you can also purchase compost in bags. I always look for OMRI Certified Organic Compost.
Wood Chip Nitrogen Problems & Solutions
Remember the part of Back to Eden Film, for the installation of the Demonstration Garden in Pennsylvania, when they install fresh wood chips in the Spring? First they laid down newspaper and then a layer of about 8 inches deep of aged wood chips (way too thick, oops!). They immediately plant their garden and they start to see tomatoes with yellow leaves. So, they have to add organic fertilizer to fix it. After this section we show the same family installing a second version of Back to Eden Garden in the spring. This time they add a layer of compost first and even a dusting of horse manure on top to be safe. This method did much better for immediate spring planting.
Step 3: Add a Layer of Wood Chips
Adding Fresh Arborist Wood Chips
Add a layer of about 4 inches of fresh or aged arborist wood chips. The fresh wood chips have the benefit of having fresh green leaves that provide nitrogen to your soil, which benefits plant growth. Aged wood chips can have the benefit of being more finely ground and broken down.
Adding Composted Arborist Wood Chips
You can choose to skip adding fresh arborist wood chips to your garden plot and use screened and composted wood chips instead. However, these can be challenging to find and are usually not free.
Paul Gautschi directly sows seeds using both of these methods. He plants vegetable seeds in the soil below his fresh, coarse wood chip mulch layer in his orchards and at his second property in Seqium, WA. He also buys screened, composted wood chips to direct sow seeds in at his primary home vegetable garden plot. Additionally, he adds composted vegetable waste and chicken manure to his screened compost vegetable plot. Both methods work amazingly well! If you do not use fresh wood chips with lots of green nitrogen rich leaves you may benefit from adding nitrogen in the form of composted manure or liquid fertilizer.
Pros and Cons of Fresh Versus Composted Wood Chips
From my personal experience the benefits of using fresh arborist wood chips outweigh the cons in the long run. Fresh arborist wood chips win in terms of soil moisture retention, weed suppression, attracting beneficial microbes and fungi growth and building healthier soil that mimics nature. The only drawback of using fresh arborist wood chips compared to composted and screened wood chips is that when germinating seeds you have to be careful to push them aside in order for sprouts to successfully grow. This can be challenging at first or if your mulch is too thick. The other drawback may include increased decomposer pest activity (slugs, pill bugs) especially in very wet climates.
Where Do I Get Wood Chips?
If you are based in the USA we highly recommend you try Chip Drop to make a request to get free wood chip deliveries from local tree trimming services. Make a donation offer, describe what kind of wood chips you are looking for (ie. nicely chipped for gardening) and if you don't get any response initially, keep trying!

Other ways to find free arborist wood chips include:
Calling tree service companies directly to make a request. Foraging wood chip piles on public property. Buying green waste composted mulch from a compost facility.
Do NOT buy bulk landscaping mulch deliveries or bagged bark or wood chip mulch for your vegetable garden!
STEP 4: PLANTING IN YOUR BACK TO EDEN GARDEN
How To Start Planting in Your Back to Eden Garden Immediately
When you install a layer of paper in the summer or spring to kill tenacious weeds and grasses the paper layer will not have enough time to decompose by the time you want to be planting. For example, WeedGuard paper takes 3-6 months to decay. This should not keep you from planting in the Spring. However, it is important to take some simple steps to allow your plant's root system to access the soil and grow happily!
How to Plant Starter Plants
Using starter plants can be a very successful option for beginners who got a late start on their garden planting season. If you are transplanting start plants, temporarily pull back the wood chips and compost from the surface to expose the paper underneath. You can use a knife to cut an X in the paper. Then simply dig your hole and plant your transplant in the soil. Gently pull the compost and wood chips back around the base of the plant. The compost and wood chips will help the paper decompose, deposit nutrients when watered, and prevent weed and grass infestations without intensive labor.

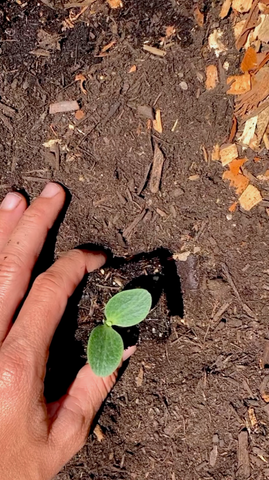
How to Plant Seeds
If you are planting a row of seeds, temporarily pull back the wood chips and compost from the surface to expose the paper underneath. You must plant seeds directly into your soil or compost -- this is the layer directly underneath your wood chip mulch that is fine, aerated, dark brown, spongy, organic matter. However, your plant's roots will need to be able to get through the paper layer into the soil below, so you will need to cut or hole punch the paper layer where you plant seeds. You can use a dibber to easily make holes in the paper. Make sure the holes are big enough (2-4 inch diameter) for sunlight to access the seed and germinate. Alternatively, you can buy the Weedguard Prepunched Hole Paper to save time and labor. Then simply sow your seeds in the holes. Cover the seeds with compost. Water the seeds. Once your seeds have sprouted and have grown at least several inches tall and put out several leaves you can side-dress your plants with wood chips.
PLANTING TIP: Radish seeds are the first seeds you should plant in your Back to Eden garden to test if the soil is ready for planting seeds. Radish seeds germinate quickly and both the color of the leaves and the health of the root help determine your soil quality. If the sprout comes up yellow, it is an indication that your soil is nitrogen deficient and you will need to add a layer of composted animal manure as fertilizer. If your radishes fail to produce a vegetable root but they still have a healthy top it is a clear sign your soil lacks potassium and phosphorus. You can amend your soil by adding wood ash (for potassium) or bone meal (for phosphorus). If the sprout is green and your radish root is red, your soil is healthy and you are ready to plant in your Back to Eden garden!
The Easiest and Best Seeds to Plant

Depending on the time of year and your growing zone, you may be able to still plant spring/summer seeds or even get started on planting your fall & winter crops at this time. Starting with organic, heirloom and high germination rate tested seeds is important. Here are some of the easiest hand picked selections to help you get started with a selection of best varieties based on the growing season. Remember to plan ahead for fall harvest by planting crops in the summer.

Plant Perinneals to Grow Your Edible Food Forest!
Consider planting perennials as a highly beneficial addition to your edible paradise. Plants like fruit bushes, vines, berries, herbs and fruit and nut trees can last a lifetime without needing to be planted again! They provide tons of benefits to your vegetable garden - shade, saving labor and providing reliable food, while enriching your soil with their leaves and roots. Perennial food forests can dramatically improve the results of your annual vegetable garden and save you work by creating an optimal growing habitat!

STEP 5: WATER YOUR SEEDS / STARTERS
Seeds need to be evenly moist to germinate. If you live in a climate that does not get enough rain for your seeds to germinate on their own you should water daily until they come up. Once they come up, stop or dramatically decrease watering. It's easy to over water when you see a dry soil or mulch surface. Always stick your fingers two inches deep into the soil to feel for moisture before assuming you need to water. If it's moist, don't water. You can easily kill plants and rot their roots if you're not careful. Your plant's roots will grow stronger and need less and less watering as they grow.
You Did It!
Enjoy your Back to Eden Garden immediately and watch it get better and better every growing season! Remember to add another layer of 4 inches of arborist wood chips every year in the Fall or whenever the layer is decomposed enough to become thin.
Learn how to start a Back to Eden Garden in Raised Beds or Containers